 During the Fifties and Sixties, most of the entry-level vehicles produced in the UK and Europe were spartan in finish, including when it came to upholstery.
They often featured front and back seats or benches upholstered in materials better known for their durability then their comfort or eye appeal such as moquette or vinyl..
 These materials were chosen for their practicality rather than for luxurious aesthetics, leaving little room for extravagant embellishments.
After being in use for decades and potentially been in storage for several more additional years, it is highly likely that the car's upholstery will be in a less than optimal condition when the car and the restorer first come together.
In such cases, it is often necessary to completely restore the upholstery to return it to its former glory- an expensive and time-consuming job best handled by experts. If the frames are in good shape it might be possible to repair the existing upholstery , although this may also come at considerable costs.
A convenient and user-friendly alternative that has become increasingly popular is the use of pre-made seat covers. These covers are readily available in the market and are reasonably priced, making them a cost-effective option for consumers.
 Although it may seem like a cost-effective solution, it is important to note that fitting replacement seat covers is not a straightforward task and should not be considered a quick fix for underlying issues.
Significant effort and attention will be necessary throughout the process; otherwise, the entire endeavour will be nothing more than a futile attempt to save money.
![]() The initial and necessary step is to remove the existing covers.
The initial and necessary step is to remove the existing covers.
Given that these items are destined for disposal, it is not necessary to handle them delicately. However, it is important to exercise caution to avoid causing any harm to the frame and fillings, assuming they are still present and undamaged.
 After removing the initial covering, it is important to proceed by inspecting the springs and foam. It is likely that the driver seat and potentially the front passenger seat will require refurbishment.
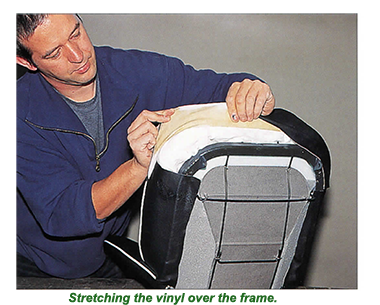
After completing all the necessary preparatory tasks, the subsequent step involves unpacking the covers and arranging them in a manner that facilitates their seamless attachment to the seat frames.
At this stage, it is important to address any flaws in the way the covers have been sewn together before attempting to dress the frames with them.
 One of the common issues that often arises is related to the fluted sections of the backrest. Typically, these sections have been bonded together instead of being sewn. It is important to allocate sufficient time to ensure that the flutes have enough play to fit nicely on the backs and that the so-called seam is perfectly straight, without any crookedness.
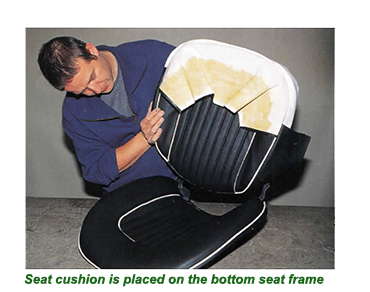
The task of working on the seat squabs is generally easier compared to working on the backs. The initial step involves securely attaching the panel board, which is a standard component, to the underside of the wire seat frame. Following this, the foam is then affixed to the seat.
Another potential issue that may arise is related to the piping system, which must be carefully aligned along the perimeter of the metal shell. If the piping does not align properly with the body, it can have negative aesthetic effects and may eventually develop wrinkles, causing discomfort when sitting on it.
It is crucial to keep in mind that, considering the typical shape of backrests, the cover should not be fully sewn up. It is advisable to leave some room, usually at the widest point in the lumbar region, and then taper it off sharply towards the bottom.
If the cover is not properly adjusted, it may become too tight at the bottom, making it difficult to pull it over the backrest. It is important to take the time to conceal the areas that have not been sewn up.
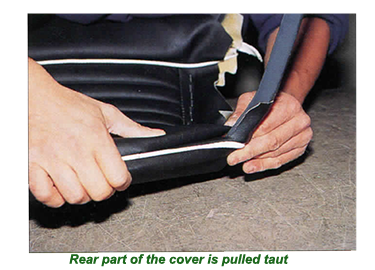
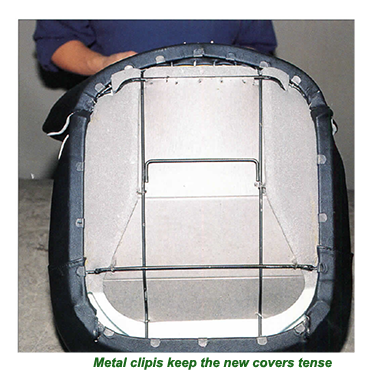
To ensure a secure fit, it is important to tightly pull the cover of the back of the seat, specifically where the piping is sewn on. This should be done against the seat frame, and promptly secured in place by firmly clipping it.
 Additionally, it is important to note that the material located at the front should be gently pulled downwards and subsequently inverted, effectively turning it inside out.
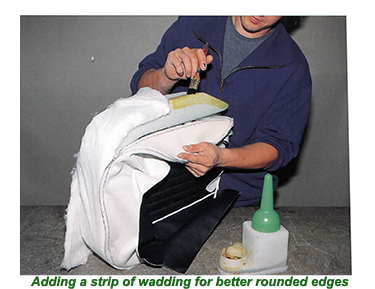
If a gap becomes noticeable during this stage, it may be necessary to make some adjustments, such as removing a strip of the foam padding until all components align properly.
 The subsequent steps are easily understandable and uncomplicated.
To secure the side panels, carefully lower them and attach them securely to the seat frame using clips. After completing the previous steps, proceed to carefully lower the front sections of the vinyl material and securely fasten them in place.
The effectiveness of this product (as well as its aesthetic appeal) will be contingent upon the precise alignment of the seating surfaces with the underlying foam padding.
If the tiles are installed with even a slight misalignment, it can result in the pipes not running in a straight line as well.
 Once all the necessary components have been properly aligned, the final step is to remove any excess material and tidy the job up.
Many experienced classic cars restorers, and especially the purists, are inclined to installing custom-made seat covers as a "shortcut", which may lead them to dismiss the idea.
However, if the process of fitting the covers is executed in accordance with the instructions provided and with meticulous attention to detail, the outcome will be acceptable, as well as resulting in substantial cost savings.


Take me back to the home page.
Take me back to the home page.
cu2