 Anyone restorer considering giving their car a full respray without involving a professional paint shop should think twice -or even three times.
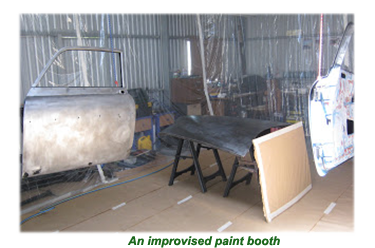 Not only is concrete knowledge and experience necessary to take on such a project- the cost of professional equipment and, more specifically, a spray booth is liable to cost more than the car and the rest of the work required to bring it to the painting stage!
If only parts of the vehicle need to be resprayed, it is worth checking out the cost of hiring spraying equipment.
All that is required is a spray gun and a compressor, which can be hired or better still borrowed if this restoration is going to be a "one-off."
To carry out a quality respray, it is recommended to use a suction feed gun fitted with a quart container, sufficient capacity to give the average size car a single coat of paint.
>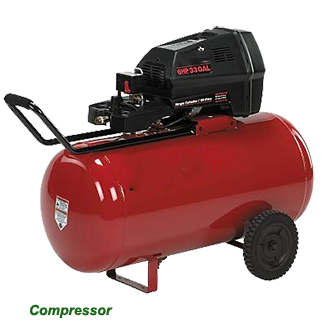
 The spray gun is powered through a stream of compressed air, which siphons paint from a container attached to the spray head, with the level of power pre-set to spray paint from the nozzle at a controlled pace of around four cubic feet per minute.
With an average compressor capable of generating 2.5 horsepower, translating to ten cubic feet per minute, it is vital to set the pressure level at no more than 70psi.
Car spraying is usually carried out vertically with the spray gun's horn, resulting in a perpendicular spray pattern.
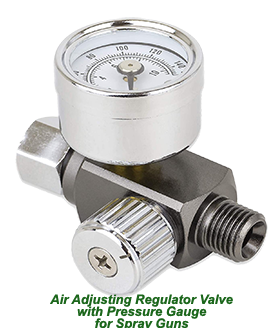
Most spray guns are fitted with a spread adjuster valve, which ensures that the gun is opened as far as it will go. The fluid adjusting screw should be kept in an anti-clockwise position until the first thread is visible.
If the preferred spray path is, for example, ten inches wide, the fluid adjusting screw should be set at 55psi will produce a pattern about ten inches wide.
If a broader or narrower pass is called for, then the fluid adjusting screw should be adjusted accordingly.
![]()
At this point, paint atomisation comes into play. Paint atomisation describes the skill of efficiently transferring paint to a target object by using an applied force to break the paint down to controllable droplets directed by air to coat a target object.
 The paint droplets' size can be varied according to paint flow rate, paint viscosity, and the air pressure settings on the paint spray gun.
 If atomisation levels have been set too fine, the fault will soon show itself by excessive overspray or a dry spray. To alleviate this fault, air pressure should be reduced while keeping the fluid adjustment wide open.
At the other extreme, if atomisation levels are too high, it will manifest by producing a speckled effect or a dimpled finish on the paint coat. To put this right, air pressure should be increased or the flow of paint reduced
To achieve the best results from a spray gun, four principal rules must be adopted:
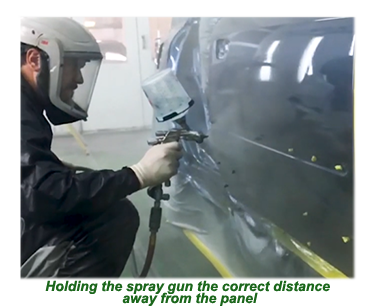
(1) The gun should be held six to eight inches from the surface to be sprayed. The most prominent part of the gun is the air cap, designed to harness the air energy delivered at this distance. If the spray gun is held too close, the coating will be very wet and non-uniform, but far away, the result will be a sandy and uneven coat of paint.
(2) It is vital to ensure that the gun is stroked at the right angle across the surface to be sprayed. Pointing the gun up (arcing) or down (angling) will produce an uneven spray. Typically spraying is carried out in a horizontal direction to the object being sprayed. If a vertical stroke is preferred, the air cap can be rotated 90 degrees, producing a horizontal spray pattern and permitting vertical spraying.
(3) When the gun is being moved backwards and forwards across the car, overlap the spray coats by a good 50 per cent.
(4) Before starting the next painting stroke, the spray gun's trigger should not be fully released. Instead, the sprayer should make sure that the gun is mobile before the trigger is pulled and will keep moving after the trigger finger has been relaxed.
![]()
(5) It is also crucial that the sprayer positions themselves correctly 'left of centre' from the item to be sprayed.
After a lot of preparation, the time has come to start spraying some paint. Step one is to mix the paint with thinners, paying close attention to following the recommended ratios.
Most experienced car painters will take around ten minutes to complete an average size panel- Using that fact as a guide should be observed- more time will probably mean overspraying and less-underspraying.
 It should take around ten minutes for the paint to dry on each panel, after which they should be left for no less than forty minutes to allow the paint to cure before the next round of paint applications.
 An average full respray will require three to four coats, each time observing the paint manufacturer's recommended drying time clearly marked on the paint can.
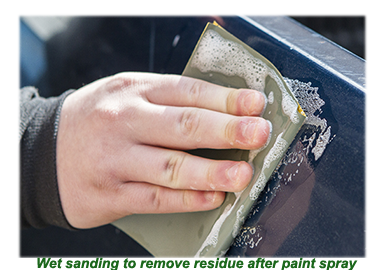
Before applying the final coat of paint, if there are any traces of powdery residue, they must be removed.
 Removing residue should be done with great care, using 2000-grit wet-and-dry sandpaper. After sanding, the paintwork should be gently and wiped down with a clean moist rag.
If a coat of lacquer is being added, these steps must be repeated.
> To prevent any possible harm to the paintwork, it is essential to remove all of the masking tape, ensuring no scrap becomes attached to the paint while it is still wet.
By following these steps and using a lot of care and attention, it is highly possible to respray all or part of a classic car in-house, gaining the double-edged satisfaction of a job well done and a lot of money saved.


pw3